Thursday, 27 October 2016

Week 12 - Online Website Builders

Where does one start!! There are many, many players in the FREE online website building category. Most of them have similar functionality and allow you to create websites for free using drag and drop technology. No need to code and if you need more than what is provided for free, many of these have upgrade packages available at an extra cost.

Under a free account, the free tools will give you a set amount of space and access and allow you to host your website with them under a subdomain. Many of them also allow you to also link your website with a domain name and will offer a variety of hosting options.

Domain Vs Subdomain

You can create and resister your own domain name - lots of different packages available and cost can be as little as a few dollars.

The following links will give you information about domain names and how to register

https://www.business.gov.au/info/run/advertising-and-online/register-a-website-name
https://www.auda.org.au/


http://www.domainregistration.com.au/
https://www.crazydomains.com.au/
https://au.godaddy.com/

A domain name could be:
www.michelehardy.com.au

The same website as a subdomain might be:
www.michelehardy.wix.com
www.michelehardy.blogspot.com.au

Free online website builders

Here is my list!
  • Wix
  • WebsiteBuilder
  • IMCreator
  • Sitebuilder
  • Sitey
  • Weebly
  • Jimdo
  • Site123
  • Webs
  • Webnode
  • Yola

Wix

http://www.wix.com/


Website Builder

https://www.websitebuilder.com/


IM Creator

http://www.imcreator.com/


SiteBuilder

https://www.sitebuilder.com/


Sitey

https://www.sitey.com/


Weebly

https://www.weebly.com/au


Jimdo

http://www.jimdo.com


Site 123

https://www.site123.com/


Webs

http://www.webs.com/


Webnode

https://us.webnode.com/


Yola

https://www.yola.com/


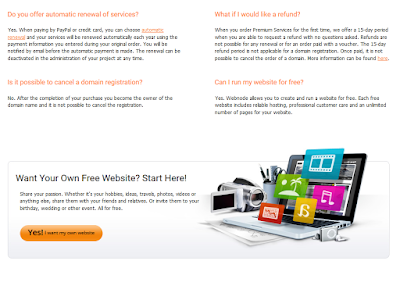
Here are a couple in Action!

Wix


Webs


IMCreator


Activity 1


Select 2 of the above tools (or any other that you use or know of) and create a sample webpage.
Share your thoughts on the tools with your classmates.


Week 12 - Closing out report

Closing out the project

The main task at this stage is the handover of the deliverable, as scoped, to the client. At this stage you tick off the items and ensure that everything within the project has been finalised. The key areas of this stage are:

  •     Client acceptance
  •     Lessons learned
  •     Celebrating success
  •     Stakeholder debrief and evaluation
  •     Closing out the project
  •     Contract close-out

The ultimate aim of project management is to bring the project to a successful and complete conclusion. Hopefully, if you have done your job properly, this would have been closely monitored and evaluated against the predetermined criteria with little room left for ambiguity or missed expectations.

As well as delivering the project to your client, the project manager and team members should use this time to look back over the project for mistakes made and the lessons learned as a result. The final stage should involve:

  •     Delivering the project’s objective, output or final result
  •     Finalising all the administrative issues
  •     Evaluating the project and the process

Do all project finish successfully? NO!!! Some projects

  •     Fail to finish at all
  •     Drift off in a non-scheduled (and non controlled) direction
  •     Are superseded with newer ideas and supporters.

Class Activity

Can you think of an example of a project that has failed to finish? Which of the above reasons do you think apply to why the project failed to finish?


If a project is not going to be completed successfully, when do you terminate the project or decide that the project should not continue?

You can start by asking the following questions throughout the project:

  •     Is the project still consistent with the organisational goals?
  •     Is management enthusiastic about continuing the project?
  •     Does the project enjoy cross-functional support?
  •     Is there still a return on investment?
  •     Are there better alternatives for the funds, time and personnel devoted to the project?
  •     Is the project team still innovative?
  •     Has the project lost any key personnel?
  •     Can the deliverable be more efficiently purchased or subcontracted rather than being developed in-house?
  •     Have any changes in the marketplace warranted the project’s outcome and/or termination?
  •     Is the client satisfied? (Has client acceptance been obtained?)
  •     Is the current project team properly qualified to complete the project?
  •     Do other projects warrant higher priority?
  •     Is the probability low that the outcome will be realised?
  •     Are all the tasks finished?
  •     Is the testing finished?
  •     Are the training programs prepared and/or finished?
  •     Is the supporting equipment installed and operating?
  •     Are the documentation manuals finished?

Client Acceptance

The only stakeholder who can ultimately know whether the project is finished or not is the client. The process of acceptance should always be completed as formally as possible so that there is a comprehensive sign off on each and every aspect of the deliverable. This should include the following:

  •     A written acceptance procedure;
  •     A completion checklist;
  •     Specification conformance;
  •     Acceptance or performance testing; and
  •     Final payment

Lessons Learned

Every project, whether successful or not, will generate a ‘lessons learned’. A lessons learned is just that – some practical wisdom that has been observed and hopefully acquired while working on the project.

Lessons learned can be both positive and negative from both mistakes and successes during the project.

Lessons learned must be documented and shared with the other stakeholders, perhaps in a project review document or final project report. The information can then be used when planning and managing future projects.


Celebrating Success

Every project has some success and success should be rewarded. Some of the ways that you can reward your project team are:

  •     Introducing the team members to the client
  •     Taking the team members out for a meal or coffee
  •     Printing up some certificates
  •     Formally appraising and recording the team members’ positive performance
  •     Passing positive feedback on the team on to their line and/or functional managers
  •     Getting all team members to give each other positive feedback on the tasks they performed
  •     Giving the team members challenging duties and/or more complex project work
  •     Channelling your personal feedback to the team members up the chain of command so a higher authority can be seem to be recognising their contribution
  •     Recommending the team members for promotion as a result of their project achievement
  •     Holding a PARTY for the team

Stakeholder debrief and evaluation


At the end of a project you need to bring the stakeholders together for a final debrief and evaluation of their contributions, feelings and outcomes.

The Client
You need to get feedback from the client:

  •     Was the project delivered as specified?
  •     Was the reporting documentation accurate?
  •     Was the project delivered on time?
  •     Were the communication channels kept open at all times?
  •     Was the project delivered on budget?
  •     Were all variations and scope changes addressed competently?
  •     Was the project managed professionally?
  •     Were the issues resolved in a win-win solution for all?
  •     What improvements can you suggest with regard to how future projects are set up and managed?

The Stakeholders
Stakeholders are anyone with a vested interest in the project’s outcome. Each stakeholder should be questioned so that you gain an understanding of the project from their perspective:

  •     Were you satisfied with your level of involvement in the project?
  •     Were you always kept informed of the project’s achievements and failures?
  •     What part did you play in the decision making processes
  •     Could the consultation processes be improved?
  •     What improvements can you suggest with regard to how future projects are set up and managed?

The Project Manager
The project manager has had a lot riding on their back throughout the project so you should take the opportunity to review their performance also.

  •     Were you satisfied with you access to, and support from, the relevant stakeholders?
  •     Do you believe you had sufficient time, budget and resources to complete the project?
  •     Did you have the appropriate level of authority, power and responsibility?
  •     Was the project team appropriately skilled?
  •     Do you require any additional training?
  •     How effective were your leadership skills?
  •     How effective were you at motivating and rewarding the team?
  •     What improvements can you suggest with regard to how future projects are set up and managed?

The Project Team
You should meet with the project team one last time and get feedback as they were the ones doing the main work.

  •     Was your workload appropriate?
  •     Were all the disputes resolved amicably?
  •     Were all decisions reached through consensus?
  •     Did your level of skills reflect the nature of the tasks you worked on?
  •     How would you describe the project environment in which you worked?
  •     How would you describe the project manager you worked for?
  •     Did you always have sufficient information, time, resources and money to make the decisions you were required to make?
  •     What improvements can you suggest with regard to how future projects are set up and managed?

The Close-out Report
The close-out report should be a summary of the highs and lows, success and failures, of the project through the concept , outline, progress and outcome stages. It should address the project performance, administrative performance, organisational structure, project teams, and project management techniques.

Contract Close-out
If you have entered into any formal contracts during the project development, such as maintenance contracts, client contracts, warranties etc., you will need to make sure that these are closed off and/or signed off.

Thursday, 20 October 2016

Week 11 - Using Bloggr to create a website

Blogger

Today we would look at our first web page creation tool because it is one that most of you are already familiar with - Blogger!!  If it is not one that you have used, you are still familiar with it because it is one that I use.

https://www.blogger.com/

Once you have logged in etc., you can start by creating a new Blog


At this stage, it really doesn’t matter which theme you choose as you can change and customise it at any time.


Once you have selected your theme, you can customise the colours, background images, fonts and page layout. Once you are happy, save and return to Blogger.


Click on Layout.


In Layout mode, you can add, remove or edit any of the “gadgets” that are on your page. This allows you to customise your “web page”.

If you want to include additional pages, select Pages from the left navigation pane.


Click on New Page for each page that you want to add. The title will be what will appear on your navigation. Make sure you PUBLISH them when you are happy.

Once you have pages, you can include the “Pages” gadget to create a simple navigation system.


Here is a preview of my Blogger website:


So you might ask about using your own domain name rather than something .blogspot.com. Well with Blogger, you can.

Go into Settings and change the Publishing Settings if you would like to use your own domain name. You can register a domain name at a variety of places on the Internet. Prices do vary!!


Week 11 - Tracking your Project

Once your project has been set and is underway, the role of the project manager is to keep track of all aspects of the project.


Baselines

To be able to track your project, you need to tell your project management software that the current version of the project file is the one that you want to save and use to compare with. This process is setting a baseline.

http://www.rationalplan.com/projectmanagementblog/project-management-terms-baseline/


So, for our Big Move project, we have added all of the tasks and allocated is as required and we are happy with it. We can now set this as our first Baseline.

Here is my version of the project:


I will put a copy of this on Moodle for anyone who wants to use the same file.  It doesn't really matter which file you use, but it MUST be a complete plan or at least have all the details for the items that are in the WBS.

Setting your Baseline

Project Libre allows you to have up to 11 baselines.


To save a Baseline, click on Save Baseline and select which Baseline number this particular baseline will be. I chose Baseline with no number.


Once you have set your baseline, you should see a grey shadow underneath all of your gantt bars.


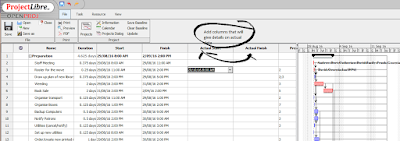
Add some columns that will allow you to enter and/or view actual data.


Entering your "actual" data.

There are a number of ways of entering your actual data. The first is by entering the "Actual Start Date" for each task. You can do the same with "Actual Finish Date" as well.


 You can also go into the properties for each task and add actual data.


You can change the percent complete and/or the work hours. You can also change information that is under Resources Usage.


Thursday, 13 October 2016

Week 10 - Risk Management

What is Project Risk Management?


Project risk management is the art and science of identifying, analyzing, and responding to risk throughout the life of a project and in the best interests of meeting project objectives.

The goal of project risk management is to minimise potential risks while maximising potential opportunities or payoffs.

The major processes involved in risk management include:

Risk management planning – this involves deciding how to approach and plan the risk management activities for the project by reviewing the project charter, WBS, roles and responsibilities and the stakeholders risk tolerances.

Risk identification – this involves determining which risks are likely to affect a project and documenting the characteristics of each.

Qualitative risk analysis – this involves characterising and analysing risks and prioritising their effects on project objectives.

Quantitative risk analysis – this involves measuring the probability and consequences of risks and estimating their effects on project objectives. These can then be ranked based on the probability.

Risk response planning – this involves taking steps to enhance opportunities and reduce threats to meeting project objectives.

Risk monitoring and control – this involves monitoring known risks, identifying new risks, reducing risks, and evaluating the effectiveness of risk reduction throughout the life of the project.

Risk Management Planning

A risk management plan documents the procedures for managing risk throughout the project.

A risk management plan summarises the results of the risk identification, qualitative analysis, quantitative analysis, response planning, and monitoring and control processes.

The risk management plan can include a methodology for risk management, roles and responsibilities for activities involved in risk management, budgets and schedules for the risk management activities, descriptions of scoring and interpretation methods used for the qualitative and quantitative analyses of risk, threshold criteria for risks, reporting formats for risk management activities, and a description of how the team will track and document risk activities. It can also include contingency plans, fallback plans, and contingency reserves.

Contingency plans are predefined actions that the project team will take if an identified risk event occurs.

Fallback plans are developed for risks that have a high impact on meeting project objectives, and are put into effect if attempts to reduce the risk are not effective.

Risk Identification

Identifying risks is the process of gaining an understanding of what potential unsatisfactory outcomes are associated with a particular project.

In addition to identifying risk based on the nature of the project or products produced, you can identify potential risk according to project management knowledge areas:

Integration – Inadequate planning; poor integration management; lack of post-project review; poorly defined life cycle; Inadequate methodology

Scope – Poor definition of scope, work packages or expectations; incomplete definition of quality requirements; inadequate scope control; lack of documentation; Incomplete requirements identified; Lack of scope control measures for later changes

Time – Errors in estimating start and finish time or resource availability; errors in determining the critical path; poor allocation and management of float; Tight timeframes on critical tasks.

Cost – Estimating errors, inadequate productivity, cost, change or contingency control; poor maintenance; security, or purchasing.

Quality – Poor attitude toward quality; substandard design/materials/workmanship; inadequate quality assurance program; Incomplete specification; Poorly skilled resources; Lack of reviews and monitoring.

Human Resources – Poor conflict management; poor project organisation and definition of responsibilities;  Poor management and leadership styles; Poor skills and training; Team performance issues; No ownership; Allocation and over-allocation issues

Communications – Carelessness in planning or communicating; lack of consultation with key stakeholders; little accountability; Poor reporting of progress, deviation and correction; Them and Us mentality; Inappropriate reporting procedures.

Risk – Ignoring risk; unclear analysis of risk; poor insurance management

Procurement – Unenforceable conditions or contract clauses; adversarial relations;  Solvency of supplier; Supply and logistic problems; Compliance with specification; Delivery delays.


You can also categorise risks by outside forces:

Competitor  

    Merger activity
    Market acquisitions
    Plant closures
    Price fluctuations
    Introduction of new product or service offerings
    Reduction in operating costs

Economy

    The economic cycle
    Changes in exchange rates
    Government fiscal and monetary policy
    Unemployment rates
    Interest rates

Technology

    Rapid advancement in hardware and software capability
    Production efficiencies
    Mass production
    E-commerce opportunities

Marketing

    Release of competing products or services
    Market share
    Consumer response rates to advertising
    Accuracy of market research

Finance

    Availability of funding
    Funding contingencies
    Penalties/costs associated with funding
    Unanticipated changes to scope

Organisation

    Restructuring
    A move towards outsourcing
    Fluctuating morale and motivation issues
    Availability of staff

People

    Skill deficiencies
    Training requirements
    Lack of control

Outcomes

    Deliverables that are poorly defined
    Lack of user involvement
    Outcome not accepted by client

Stakeholders

    Unknown and/or changing needs
    Lack of participation

Qualitative Risk Analysis

Qualitative risk analysis involves assessing the likelihood and impact of identified risks to determine their magnitude and priority.


A risk probability can be described as being high, moderate, or low. You can also show the probability using a numeric scale. There are a number of techniques that can be used to rank the probability of risks occurring and the effect on the project outcome. They include:


  •  Probability/Impact Matrixes
  •  Top 10 Risk Item Tracking
  •  Expert Judgement


Once you have identified the probability, you can determine what the consequences of the risk will be. Consequences can also be ranked as high, moderate or low or by using some descriptive words such as insignificant, minor, moderate, major, or catastrophic.

The best way to show the risk analysis is with a table that shows the
RISK,
PROBABILITY,
CONSEQUENCE, and
PERSON RESPONSIBLE.

You can then add a column for your action plan - See Risk Response Planning

Quantitative Risk Analysis

The main techniques for quantitative risk analysis include decision tree analysis and simulation.

A decision tree is a diagramming method used to help you select the best course of action in situations in which future outcomes are uncertain.

Simulation uses a representation or model of a system to analyse the expected behaviour or performance of the system.

Risk Response Planning

After risks are identified and quantified, an organisation must develop a response to them. Developing a response to risks involves defining steps for enhancing opportunities and developing plans for handling risks or threats to project success.

The four basic response strategies are:

Risk Avoidance – involves eliminating a specific threat or risk, usually by eliminating its causes.
Risk Acceptance – means accepting the consequences should a risk occur and monitoring both the risk and the consequences.
Risk Transference – is shifting the consequence of a risk and responsibility for its management to a third party.
Risk Mitigation – involves reducing the impact of a risk event by reducing the probability of its occurrence.
Risk Exploitation - not all risks have a negative outcome. A risk may be able to be exploited to create a positive outcome


Risk Monitoring and Control

Risk management and control involves executing the risk management processes and the risk management plan to respond to risk events. Executing the risk management processes means ensuring that risk awareness is an ongoing activity performed by the entire project team throughout the entire project.

The easiest way to get started is to create a table with the following headings:
Risk - What are the risks to the success of this project
Probability - What is the probability of the occurrence of the risk: Low, Medium, High
Consequence - If this happens, what is the consequence to the project - Low, Medium, High, Critical
Strategy - What is the response strategy category -  Avoidance, acceptance, transference, mitigation.
Person Responsible - Who is responsible for the strategy

CLASS ACTIVITY

As a class, create a Risk Management Plan for "The Big Move" scenario,


Week 10 - Assessment Details


ASSESSMENT TASKS


(A)
Social Media Report
Create a short report on Social Media and how libraries are using social media to connect with their customer base. Your report should include details on the types of posts and customer response. (approx. 1000 words)
20

(B)
Social Media Policy
Create a Social Media Policy outlining the rules for promoting your library and events using social media.
10

(C) DUE 21/10/2016
Questionnaire and Design Brief
Questionnaire - This is to be created by you and filled in by your assignment partner (15)
Design Brief - This is to be created by you based on information provided by your partner in the questionnaire (15)
30

(D) DUE 28/10/2016
Timeline/Gantt Chart
Work Breakdown Structure, Must include Headers for task groups. (15)
Time estimates and Relationships/Dependencies entered. (15)
30

(E) DUE 4/11/2016
Risk Analysis - Minimum 10 Different Risks i.e. I don't want 10 different types of Hardware failure. Table format with Headings:
Risk - What are the risks to the success of this project
Probability - What is the probability of the occurrence of the risk: Low, Medium, High
Consequence - If this happens, what is the consequesnce to the project - Low, Medium, High, Critical
Person Responsible - Who is responsible for the strategy
Strategy - What is the response strategy category -  Avoidance, acceptance, transference, mitigation.
20
(F) DUE 25/11/2016
Closing Out Report and Lessons Learned. This should be minimum of 3 pages with headings and information.
  • Client acceptance
  • Lessons learned
  • Celebrating success
  • Stakeholder debrief and evaluation
  • Closing out the project
  • Contract close-out
20
TOTALS BY UNIT
ICTWEB417 - Social Media Report (20%)
ICTWEB417 - Social Media Policy (10%)
ICTWEB417 - Final Website with Social Media (70%)

ICTWEB418 - Questionnaire and Design Brief  (30%)
ICTWEB418 - Final Website with Social Media (70%)

BSBPMG501 - Questionnaire and Design Brief  (30%)
BSBPMG501 - Project Plan and Risks Analysis (50%)
BSBPMG501 - Closing Out Report (20%)


ASSESSMENT TASK G

This is worth 70% of the two web units:

DUE DATE: 25 November 2016


ICTWEB417/ICTWEB418
Completed Website as per Design Brief
30
Use of Selected website creation Tool and Features - How have you used the selected tool; Have you "value added" anything using HTML; Did you modify the template; Does it look "Pretty"?
10
Quality of Images and Text and overall Usability and Look & Feel
10
Integration of Social Media
20
TOTAL
70
Submit the URL (web address) of your completed website

Thursday, 6 October 2016

Week 9 - CSS Basics

What is CSS?

  • CSS stands for Cascading Style Sheets
  • CSS defines how HTML elements are to be displayed
  • Styles were added to HTML 4.0 to solve a problem
  • CSS saves a lot of work
  • External Style Sheets are stored in CSS files

CSS Solved a Big Problem

HTML was NEVER intended to contain tags for formatting a document.

HTML was intended to define the content of a document, like:

<h1>This is a heading</h1>

<p>This is a paragraph.</p>

When tags like <font>, and color attributes were added to the HTML 3.2 specification, it started a nightmare for web developers. Development of large web sites, where fonts and color information were added to every single page, became a long and expensive process.

To solve this problem, the World Wide Web Consortium (W3C) created CSS.

In HTML 4.0, all formatting could (and should!) be removed from the HTML document, and stored in a separate CSS file.

N.B. The above information is from W3School's website www.w3schools.com

CSS Levels

There are three levels of CSS:
  • An external style sheet is a separate document to your HTML pages. Within this one document, you can create styles for your whole website.
  • An embedded style is where you use the STYLE tag and write the code in the <head> section of each page - this will override the stylesheet for the current page.
  • An inline style is placed within the <body> section, usually with the tag that is being formatted. Inline styles will override embedded and external styles and so it can be used in circumstances where you wish to deviate from the default styling.

Web Colours

To use colours in a web page, you need to refer to the HEX code, the official web colour name or the RGB numbers. It is generally accepted that you use the HEX codes for web colours.

Web Safe Colours

"Web Safe, or Browser Safe palettes as they are also referred to, consist of 216 colors that display solid, non-dithered, and consistent on any computer monitor, or web browser, capable of displaying at least 8-bit color (256 colors)."


You can also access a list of the colours from the w3schools web site:
http://www.w3schools.com/colors/colors_names.asp

Or Use their online colour picker:
http://www.w3schools.com/tags/ref_colorpicker.asp

Or some other colour websites:
http://html-color-codes.info/
http://www.colorpicker.com/

To get a feel for different colour schemes, you can use the adobe Kuler colour (Adobe Color CC) website. This is a visual aid that you can use to pick colours and colour schemes.
http://kuler.adobe.com
https://color.adobe.com/create/color-wheel/


You can even upload an image and have it choose colours from your image. Web colours are based on RGB (Red, Green, Blue) and so may not look exactly the same as the printed version (CMYK).

Class Activity 1:


Read a couple of the following articles on colour design for web:

http://thenextweb.com/dd/2015/04/07/how-to-create-the-right-emotions-with-color-in-web-design/

http://webdesign.tutsplus.com/articles/an-introduction-to-color-theory-for-web-designers--webdesign-1437

http://www.smashingmagazine.com/2010/02/color-theory-for-designer-part-3-creating-your-own-color-palettes/

http://www.hongkiat.com/blog/basics-behind-color-theory-for-web-designer/


A colour scheme typically has ether 3 or 5 colours. Regardless of how many colours you have in your pallete, one should be your main colour and would have the largest coverage, followed by a secondary colour. Any other colours within your palette are contrasting and would have the least amount of coverage.

Create a 3 colour palette and a 5 colour palette for Mysty River Regional Library Service. Share with the class, your choice of colours and the reason why you selected them.


CSS Box Model

The CSS Box Model describes the boxes that surround any Block level elements within a web page. There are four parts to the CSS box model - margin, border, padding, content.


Each of these can be manipulated with CSS as well as height and width for any block element.

The following tags are considered "block-level" elements. When displayed, they will take up the full width available with new lines before and after.

<div>
<h1>….<h6>
<p>
<ul>; <ol>, <li>
<table>
<form>


"Inline" elements only take up as much room as needed and do not force new lines before and after.


You can override block and inline behaviours with the CSS display property:

display:inline

or

display:block


The Style Attribute can be used to apply inline styles to any HTML element. Inline styles override any global styles that have been made.

<p style="color:green; text-align:center; background-color:lightgrey">

N.B. the above will apply the styling to the current paragraph

The <style> element or tag is used to style the current document. The style tag is usually placed in the <head> section of the document.

<head>
<style type="text/css">
     p {color:green;
     text-align: center;
     background-color: lightgrey}
</style>
</head>

N.B. The above styling will apply to any <p> element within the current page

or as a separate style sheet


Use the link element to link the document to an external style sheet:

<head>
<meta http-equiv="Content-type" content="text/html; charset=iso-8859-1" />
<meta http-equiv="Content-Language" content="en-us" />
<link href="style1.css" media="screen" rel="stylesheet" type="text/css" />
<title></title>
</head>

To start styling a web page, we need to know what properties we can alter. Properties are categorised into the following:

  •     Background
  •     Border and outline
  •     Dimension
  •     Font
  •     Generated Content
  •     List
  •     Margin
  •     Padding
  •     Positioning
  •     Print
  •     Table
  •     Text


PDF Version
http://coding.smashingmagazine.com/wp-content/uploads/images/css3-cheat-sheet/css3-cheat-sheet.pdf

Styling Text

Fonts


font-family is used to specify a list of font family names and/or generic family names to be used to display text within an element. The browser will go through the list until it finds a valid font that can be used. To make sure that at least one of your choices is used, include a generic family name at the end of your list. Generic Fonts are found on most computers and do not go inside quotes when referring to them.

The Generic family names are:
•    Serif
•    Sans-serif
•    Cursive
•    Fantasy
•    Monospace

<style>
p {font-family: "Algerian", "Helvetica", fantasy}
</style>

Font Size can be specified as an absolute using pixels (px), or a measurement such as centimetres (cm), inches (in), millimetres (mm), points (pt) or picas (pc). You can also refer to a relative size such as xx-small, x-small, small, medium (default), large, x-large or xx-large. You can also use percentage (%) or the multiplier em (em).

p {font-size: 16px}
p {font-size: x-large}

Font color is specified using the color attribute, background-color is used to specify a background colour. If you use more than one attribute for the element, make sure you separate them using a semicolon (;).

p {font-family: "Algerian", "Helvetica", fantasy; font-size: 16px; color: pink; background-color: lightgrey }


Bold and italics can also be created using styles.
p {font-weight: bold}
p {font-style: italic}
p {font-style: normal}

The following are valid styling attributes for the text within the heading element
h1 {color: indigo;}
h2 {color: #4b0082; }
h3 {color:rgb(255,0,0);}

Text


You can also apply other styles using the text-decoration attribute - text can be underline, overline, line-through, blink, none.

Word and letter spacing can be changed by using:
p {word-spacing: 2px; letter-spacing: 1px}

N.B. See CSS Cheat Sheet for more information.

Background

We saw how easy it is to set a background color for any of the HTML elements. As well as color, you can also choose a background image.

Here are the background attributes:
•    background-color
•    background-image
•    background-repeat
•    background-attachment
•    background-position

To set a background image for your page, you could use:

body {background-image:url('filename');}

Background-repeat will specify whether to repeat the background if the image is smaller than the screen viewing area.

N.B. See CSS Cheat Sheet for more information

Styling Hyperlinks

Styling Hyperlinks is a little bit different to other elements.You can apply a style to all hyperlinks by styling the <a> element, but hyperlinks usually display differently when they have been visited - purple instead of the usual default blue.

A Hyperlink has 5 states that can be styled:

    Link - the unvisited link
    Visited - what the link will look like once it has been visited
    Focus - this is used if the link has been selected using a keyboard shortcut
    Hover - this is how the link will display when you move your mouse over it
    Active - This is used for the link when it has been clicked, but prior to it being "visited":


To apply link styles, use the syntax

<style>
a:link {color: black; background-color: white}
a:visited {color: black; background-color: pink}
a:hover {background-color:lightblue}
a:focus {color: red; background-color: white}
a:active {color: lightgreen; background-color:black}
</style>

Applying the Box Model

I mentioned the Box Model when introducing CSS. All Block level elements utilise the Box Model styling features.

N.B. See CSS Cheat Sheet (Box Model section) for more details

and the result:


Linking to an External Style Sheet

Within the head section of your web page, use the <link> element to link the page to the external style sheet.

<link href="mystylesheet.css" media="screen" rel="stylesheet" type="text/css" />

where "mystylesheet.css" is the name of your external style sheet.


More Cheat Sheets


http://websitesetup.org/html5-cheat-sheet/

http://websitesetup.org/css3-cheat-sheet/

http://www.bluehost.com/blog/website-design/html-css-cheat-sheet-infographic-4181/


Class Activity 2


Apply some styling to the sample page we created last week

More Social Media Integration

Facebook

To get embed code for Facebook social plugins, you need to go to the Developers section of Facebook.


Instagram

You can embed Instagram posts just as easily


https://instagram.com/developer/embedding/

For Instagram Badges
https://instagram.com/accounts/badges/


Instagram


Class Activity 3


Can you embed Pinterest?

Class Activity 4

Add a post to your Blog and include:
  • Like me on Facebook for Chisholm Institute
  • An embedded Facebook post from Chisholm Institute (or another appropriate one of your choice)
  • An Instagram Badge
  • Embedded Instagram post
  • Twitter Feed for ALIA