What is HTML
HTML stands for HyperText Markup Language and it is the main language used to create web pages. The "tags" are typed into a text editor, which are then interpreted by your web browser and your web page will be displayed accordingly.
The current version of HTML is HTML5 with CSS3. If you would like to find out more about the various versions of HTML and the history of the language, here is a good source http://www.yourhtmlsource.com/starthere/historyofhtml.html
What do you need?
Actually, you need very little to create web pages with HTML. A little bit of know how (or a good tutorial), a text editor and a browser.Text Editor
There are plenty of text editors around. If you have a Windows computer, you will have Notepad for example. You can use any text editor, but generally when coding, it is best to use a text editor that is friendly for coders. Again lots to choose from - just Google free HTML editors and you will get a list. The main difference between a text editor and a HTML editor is that the latter understands about coding and the language and will colour code your document and give you line numbers, which makes it easier to pick up any errors.I am a person of habit and so my standby HTML editor is Notepad++, which you can find here:
https://notepad-plus-plus.org
There are a number of different versions that can be downloaded, but the safest is to stick to the big buttons and you will get the installer for the latest stable version - currently 6.8.3.


Once downloaded, you can click on the file and install Notepad++ on your computer.
Browser
Any browser is fine - most people will have a preference, but with what we will be doing, any browser will do the job. You don't even need Internet access when displaying simple pages you have just created, but of course you need it if you want to publish your document on the WWW or if you are linking to other websites.Basic HTML Elements
As a bare minimum, a web page MUST have the following basic Tags or elements:<html>
<head>
<title></title>
</head>
<body>
</body>
</html>
The <html> element, will always be at the very start and end of your page.
<head> </head> defines the header area of the page. The <title> tag will always be inside the <head> tag.
<body></body> is used to start and end the content that will be displayed on your page.
You will notice that the elements are contained within angle brackets "< >". The ending tag is preceded by a forward slash "/".
The above code will produce an HTML page with no content. All you will have is a title up the top in the document tab.
Heading
The Heading Element can be used to increase the size of text on your page. Heading sizes will vary from 24 points for a heading 1 to 8 points for a heading 6. (24, 18, 14, 12, 10, 8)
To use the Heading Element use <h1> through to <h6>.
Paragraph Element
The <p> is the paragraph element. Paragraphs are automatically spaced with a blank line in between.HTML does not recognise new lines within your text editor as new lines on the web page, and will only recognise one space when interpreting the tag and content. You can only start text on a new line with a <p> tag or a <br> tag.
You will also notice, when viewing some code, the <p> tag is almost optional. Blogger, for example, does not use them in its HTML code. Good coding practice is to use them and to always have an opening and closing tag.
Break
A line break tag can be used to start a new line of text without starting a new paragraph. This is one of the exceptions to the rule that elements have a starting and ending tag. As this is not a paired tag, the forward slash is placed at the end of the tag after a space, so the syntax is <br />.Lists
There are two types of lists that you can be used in HTML. They are the Ordered List and the Unordered List.
Ordered Lists
An ordered list is a numbered list.
1. First Item
2. Second Item
3. Third Item etc.
To create an Ordered List use the <ol> element
Unordered Lists
An unordered list is created using the <ul> element
The <ul> element will create a bulleted list
- Item 1
- item 2
- item 3
With both of these list types, use the <li> </li> for each line item
Horizontal Rule
The Horizontal Rule element is used to place a line in your HTML document. It is a great way to separate different sections of a page.The syntax is <hr> (or <hr /> for compatibility)
The default horizontal rule is 100% wide and 2 pixels high.
Hyperlinks
There are three types of hyperlinks that are used on a web page.The most common hyperlink is used to open up another web page, either within this website such as for navigation, or a totally different website.
You can also use hyperlinks and anchors to move to different sections of the same document.
The last type of hyperlink is to link to an email address.
Webpage Hyperlink
The <a> element is used for Hyperlinks, The basic syntax for the webpage hyperlink is:
<a href="http://thisisthelink.com">
<a href="webpage.html"> for linking to a page within the same domain.
If you do not want to open the hyperlink in the same browser window, you can use the target="_blank" attribute to specify a new tab
To use text as the link, such as click here for the Chisholm website, you would type:
<a href="http://www.chisholm.edu.au">Click here for Chisholm website</a>
<a href="http://www.chisholm.edu.au" target="_blank">Click here for Chisholm website in a new tab</a>
Images
The <img> tag is used to place an image on your page.
<img src="filename.png"> or if the images are stored in a different folder to the document then the src would include the folder <img src="images/filename.jpg">. If the file is located somewhere else, then you will need to include the full url name for the image.
<img src="logo.jpg" height="200"> with the number referring to the pixels
<img src="logo,jpg height="200" width="150">
Images can be tricky to manipulate on a webpage. You can use the style="float: left" or style="float: right" or even easier, place it within a <p> tag, so that it is on a line on its own.
The alt attribute is used to have text as an alternative to the image. It should be included for accessibility reasons.
Tables
The last elements that we will cover today are those that relate to tables.
A Table is made up of Rows and Columns. Each block within a table is called a CELL. In HTML, we need to define what is going to be placed in each CELL. Any HTML element can be placed within a table CELL.
The HTML code to create a table is:
<table> </table> Use to define the table
<tr> </tr> used for each row in the table
<th> </th> Table Header
<td> </td> used for each cell within each row of the table.
Putting it all together
I think this is enough to get the hang of what HTML is all about. If you want more information, here are a few links to get you going:http://www.goodellgroup.com/tutorial/index.html
https://www.codecademy.com/
and my personal favourite http://www.w3schools.com/
Also heaps available from Linda.com, which you access for free from the Chisholm Library website.
To get started, I have downloaded and Installed Notepad++
I closed the documents that are opened the first time you use Notepad++
I typed in my code. Note: The image file was downloaded and saved in the same folder as the HTML.


Start by creating the simple page below. I could give you the code to cut and paste, but I think the best way to get the hang of this is to type in the code, and see what happens with errors etc.
Depending on time, we may expand on this and include code for tables and links.

Once you have your page coded and saved, you can view it in your browser. Notepad++, being the cool application it is, allows you launch your webpage from within the application.
Choose Run, and then Launch in Firefox (or whatever your preferred browser is)
This is what mine looks like. This is just a basic page - no formatting or styles have been applied to the code.

Exercise 1
Try adding some more items to your page underneath the image.Add an unordered list with some of your favourite social media tools.
Add a relevant heading followed by a paragraph outlining your favourite social media tool
Advanced option:
See if you can add a table - try W3Schools.com for more information.
Add a link to the Chisholm home page
HTML and Blogger
I know we will look at heaps of different way to create websites, but for this first example, I will use Blogger. In Blogger, you can create or edit posts and pages using Compose, where you get the menu to add elements, or HTML, where you can type in code.It doesn't really matter which tool we use, most will allow you to modify the HTML or add an HTML widget.

HTML view

Looking at the image, you can see the tags and the page contents.
Adding Social Media
Most of the Social Media applications will create the embedding code for you, so you can easily cut and paste it onto a web page. For this exercise, lets take some of the things we can do with Twitter.Twitter - Embedding a Post
to Embed a post, select your Post, use the ,,, to copy the code.


Once you select Embed Tweet, Twitter will allow it to be copied to the Windows Clipboard.
You can then paste the code where you want it to be.

XXXXXXXXX Embedded Post below
10 lies you shouldn't tell your doctor https://t.co/GIrsWN23Th pic.twitter.com/cOTjNaMYEA— Gizmodo (@Gizmodo) September 8, 2016
XXXXXXXXX Embedded Post Above
Twitter - Embed Search
This is also extremely easy to do. Go to the search screen in Twitter and put on your search Criteria. I put in #Melbourne - this will display any Tweets that have a hashtag of Melbourne.
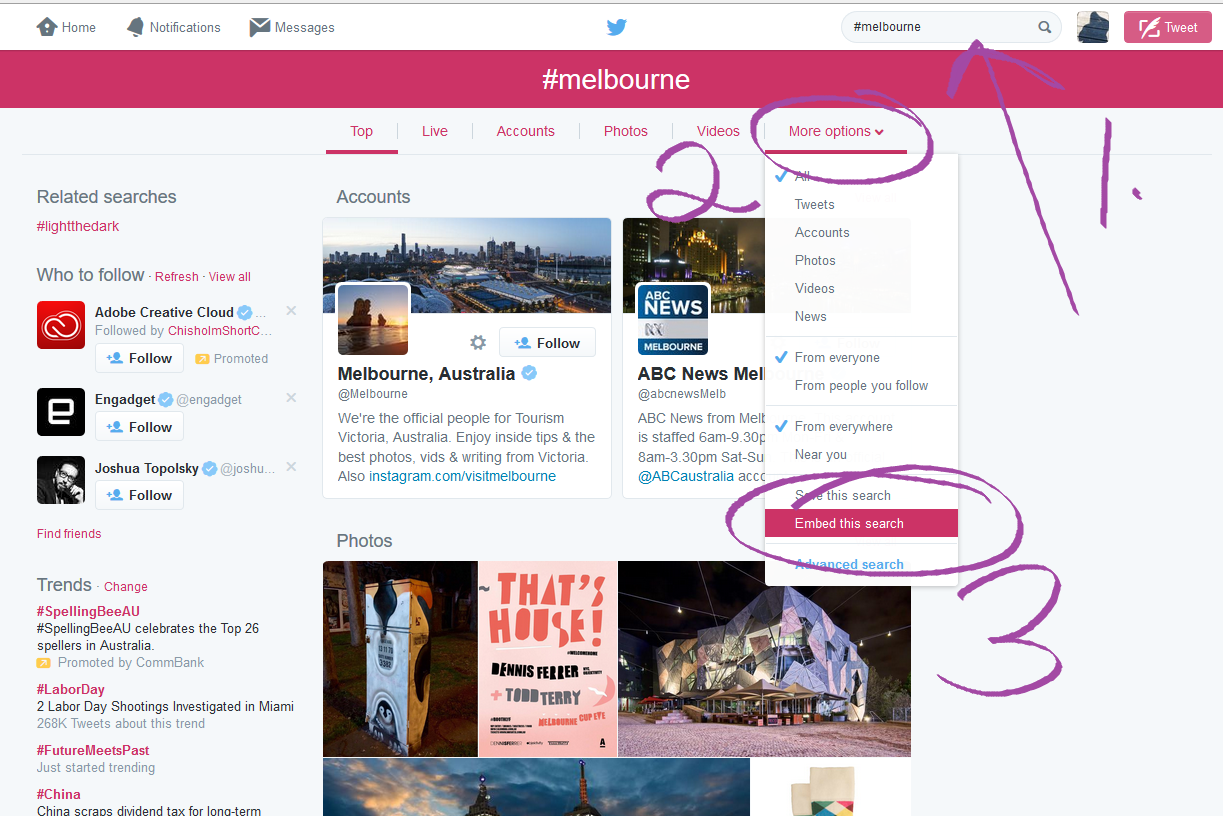
Change any Settings

Copy the code to the Clipboard

And paste into your HTML document.


XXXXXXXXXX Embedded Search Below
#StarTrek50 Tweets
XXXXXXXXXX Embedded Search Above
Twitter Buttons
Follow @mhardy62
https://about.twitter.com/resources/buttons
Go to the above link to get to the Twitter Buttons
Change any settings and copy and paste the code


Save the code and display/launch the page. If the page is already open in your browser, you can just refresh the screen.
You can also add Twitter Widgets and Buttons through your Profile Settings.

Select the last option -Twitter Buttons


It doesn't matter whether you understand the code or not - you just need to put the setting details in and then copy/paste the created code. The idea of having a basic knowledge of HTML is so that you can see where you should paste the code, not to create the code yourself from scratch.

Exercise 2
Find a video in YouTube that you like. Go to the sharing area and Embed the video on to your page.How To - if you need it!!


Next session we will look at tracking our project, CSS, and some more social media code.
If you would like to do something during the holidays - do one of the Linda.com basic HTML tutorials or look at some lessons online.
No comments:
Post a Comment